

End Of The Risen Threat
ane.
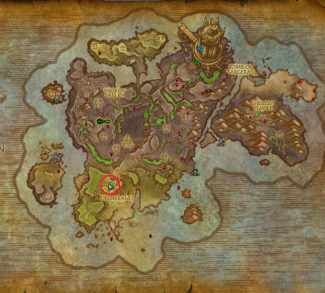
How to find the Healer Mage Tower Challenge
This claiming, End of the Risen Threat is meant for most of the healer specializations: Holy Priest, Holy Paladin, Mistweaver Monk, Restoration Druid, and Restoration Shaman. Information technology is available during the Legion Timewalking events and you tin queue for it without cost through the Mage Tower NPC (War Coucnilor Victoria) in the Cleaved Shore hub area.
In order to reach this area, you can have a portal from Orgrimmar / Stormwind'due south portal room to Azsuna and and then fly or accept the flight path to the Cleaved Shore hub, Deliverance Betoken. You can also employ the ![]() Dalaran Hearthstone to rapidly reach Dalaran and then fly to Deliverance Indicate.
Dalaran Hearthstone to rapidly reach Dalaran and then fly to Deliverance Indicate.
The Mage Tower is only 1 part of the Legion Timewalking outcome. For more info about diverse other activities that are active during this Timewalking result, or to acquire about the other Mage Tower challenges, take a look at the links below.
2.
End of the Risen Threat Challenge Overview
In this challenge you will need to defeat all enemies and the terminal dominate, Lord Erdris Thorn, in a 7-stage meet.
If whatever of your allies dies in the process, you get booted out of the challenge, so keeping anybody healthy is also primal.
Ultimately, many of the enemy abilities are designed to cause unhealable impairment unless dealt with past your utility and / or strategy. We will explain below what to watch out for and how to neutralize each power.
3.
Recommended Gear for the Challenge
Because inside the Mage Belfry Challenge yous have your gear scaled to item level l, the best gear you can use is gear above 50 that has multiple sockets available such as Legion'southward crafted legendaries ( ![]() Vigilance Perch), erstwhile gems that scale better than Shadowlands gems such as
Vigilance Perch), erstwhile gems that scale better than Shadowlands gems such as ![]() Burning Primal Diamond, and enchants that scale well at fifty such as
Burning Primal Diamond, and enchants that scale well at fifty such as ![]() Enchant Neck - Mark of the Aboriginal Priestess.
Enchant Neck - Mark of the Aboriginal Priestess.
![]() Center of Azeroth and
Center of Azeroth and ![]() Ashjra'kamas, Shroud of Resolve have extra stats relative to comparable gear for the neck and cloak slot, making them great options.
Ashjra'kamas, Shroud of Resolve have extra stats relative to comparable gear for the neck and cloak slot, making them great options.
Y'all tin also get some sometime trinkets such every bit ![]() Chipped Soul Prism which are very powerful when downscaled, but with the current tuning of the challenges, just using your regular gear should be perfectly fine as long every bit y'all follow this guide and go a decent amount of practice with the challenge itself.
Chipped Soul Prism which are very powerful when downscaled, but with the current tuning of the challenges, just using your regular gear should be perfectly fine as long every bit y'all follow this guide and go a decent amount of practice with the challenge itself.
To permit these challenges to nowadays a consequent level of difficulty over time, your various borrowed power systems will not function inside the Timewalking Mage Tower events. This includes:
- Whatsoever Covenant-related effects (Covenant Ability, Signature Ability, Soulbinds, Conduits)
- Legendary Powers from Shadowlands or Legion (the items will still provide stats, their equip effects will not)
- Legendary items from Questlines (
 Ashjra'kamas, Shroud of Resolve, Warlords of Draenor Legendary Rings,
  Dragonwrath, Tarecgosa's Rest,
  Val'anyr, Hammer of Aboriginal Kings)
 - Any Shards of Domination
- Any Battle for Azeroth systems (Azerite Gear, Traits, Essences)
- Any tier set up bonuses
- Mists of Pandaria Legendary Meta Gems
3.2.
Chromie Fourth dimension Gear for Timewalking
If you have a friend who is Level 44/45 or a second account with a character that is Level 44/45 you can apply Chromie Time to go strong gear for Timewalking past trading dungeon gear with multiple sockets to your chief character.
Sockets are extremely powerful in Timewalking content because gems are not counted towards the baseline item stat budget that is scaled downward. Likewise, legacy gems from the TBC / Wrath era comprise primary stats, which makes them much stronger than modern day gems.
3.3.
Crafted Gear for Timewalking
Crafting Mists of Pandaria Dreadful gear with ![]() Relic of the By Four or
Relic of the By Four or ![]() Relic of the Past V is a very practiced alternate source of Timewalking gear as it will have sockets and will be of a depression enough particular level to receive legacy gems and enchants.
Relic of the Past V is a very practiced alternate source of Timewalking gear as it will have sockets and will be of a depression enough particular level to receive legacy gems and enchants.
3.four.
Enchants for Timewalking Gear
Disclaimer: the enchants listed below are meant for Timewalking gear pieces. If y'all are using Shadowlands armor, most of the enchants listed will not work and you should instead apply regular Shadowlands enchants, as many of these enchants only piece of work on detail level 50 or below gear.
| Slot | Option 1 | Pick two |
|---|---|---|
| Neck | | |
| Shoulder | | |
| Cloak | | |
| Chest | | |
| Bracers | | |
| Gloves | | |
| Belt | | |
| Legs | | |
| Boots | | |
| Rings | Shadowlands Tenet Enchants | |
| Weapon | | |
3.five.
Gems for Timewalking Gear
While Shadowlands gems are mostly fine, we would recommend using primary stat gems whenever possible. For healers, these would exist ![]() Burning Primal Diamond or
Burning Primal Diamond or ![]() Burning Shadowspirit Diamond on a captain meta gem socket and one
Burning Shadowspirit Diamond on a captain meta gem socket and one ![]() Leviathan'south Center of Intellect, one
Leviathan'south Center of Intellect, one ![]() Kraken'southward Eye of Intellect, one
Kraken'southward Eye of Intellect, one ![]() Saber'south Eye of Intellect, and as many
Saber'south Eye of Intellect, and as many ![]() Timeless Tanzanites as y'all can go.
Timeless Tanzanites as y'all can go.
Also, Queen'due south Garnets can be hands obtained via the Auction House (farmed at the Dragon Soul one-time raid) and are used to craft ![]() Bright Queen'due south Garnet.
Bright Queen'due south Garnet.
3.half dozen.
Flasks for Timewalking
While y'all tin can use your regular Shadowlands flasks in Timewalking content, they have a much lower outcome due to the downscaling involved.
Thus, is is preferred to employ flasks from Battle for Azeroth (31 Primary Stats) or flasks from Legion (21 Primary Stats), as flasks from Shadowlands will merely give you twenty Main Stats.
3.7.
Trinkets for Timewalking
Using a ![]() Minor Ciphering Device (Mechagon) with the
Minor Ciphering Device (Mechagon) with the ![]() Cyclotronic Smash red card inside provides a high amount of flare-up damage, which tin can be useful in some of the stages where at that place are priority targets.
Cyclotronic Smash red card inside provides a high amount of flare-up damage, which tin can be useful in some of the stages where at that place are priority targets.
![]() Unstable Arcanocrystal (Withered J'im Legion World Dominate) and
Unstable Arcanocrystal (Withered J'im Legion World Dominate) and ![]() Chipped Soul Prism (Doom Lord Kazzak Warlords of Draenor Earth Boss) both provide a very high corporeality of stats.
Chipped Soul Prism (Doom Lord Kazzak Warlords of Draenor Earth Boss) both provide a very high corporeality of stats.
4.
Strategy for End of the Risen Threat (Healer claiming)
While each stage has its ain dangers, yous will be required to perform stiff single-target healing on friendly NPCs that do not appear on raid frames in the later stages. Brand absolutely sure that you have your all-time unmarried-target heals on mouseover keybinds gear up to become before starting, in gild to avoid wasting precious attempts considering of UI problems.
You volition also demand to dispel one NPC that is not on your political party frames afterwards on, so make sure to have it prepare and keybound ahead of fourth dimension.
4.i.
Start Stage: The Landing

The first stage is also the most challenging, as y'all will face relentless waves of three types of enemies, all of which have abilities that can end your run immediately:
You counter Corrupted Risen Mages by focusing damage on them and disrupting them to reset stacks if they become more than one or two casts off. Corrupted Risen Soldiers should be disrupted on their ![]() Pocketknife Trip the light fantasticdue south or, alternatively, yous tin can use healing cooldowns to power through the damage. Also, either use a personal cooldown or run away from their fixates to reduce damage taken. Finally, make sure to position yourself behind an ally when Corrupted Risen Arbalests cast
Pocketknife Trip the light fantasticdue south or, alternatively, yous tin can use healing cooldowns to power through the damage. Also, either use a personal cooldown or run away from their fixates to reduce damage taken. Finally, make sure to position yourself behind an ally when Corrupted Risen Arbalests cast ![]() Mana Sting and exist ready to instantly dispel it as before long every bit it lands.
Mana Sting and exist ready to instantly dispel it as before long every bit it lands.
Considering of the difficulty of this stage, we will cover each wave of enemies that y'all need to face individually:
- 1 Arbalest — this is the easiest moving ridge and you lot can just focus on positioning for the
 Mana Sting while helping with DPS;
 - one Arbalest, i Mage — focus down the Mage every bit apace as possible while using whatever interrupts, stuns, or displacements to stop its
 Cabalistic Blitz casts;
 - 1 Soldier, 1 Mage — similar to earlier, focus the Mage speedily while disrupting its casts. Remember to stun or readapt the
 Knife Dance cast one time it begins, which will give you more than enough fourth dimension to kill the Mage before another dance begins. Exercise non underestimate the damage of the Soldier fixates, as unlucky incoming crits tin can hands ruin your day;
 - ii Soldiers, 1 Mage — this is the hardest wave, as having ii soldiers volition make the double Knife Dance much more dangerous and you will accept to run abroad or use a personal immediately if you become double fixates. As ever, interrupt and kill the Mage quickly using any area of effect oversupply command y'all have to interrupt all enemies when the first double trip the light fantastic toe starts channeling. Healing cooldowns and
 Bloodlust or
  Drums of Deathly Ferocity are very useful to kill the Mage fast and also help go on your group stable through the high incoming damage, while all enemies are upwards and also on any double knife dances you get subsequently;
 - 1 Arbalest, one Soldier, 1 Mage — is similar to the ane Soldier and 1 Mage wave as long equally you position yourself correctly and dispel the Mana Sting quickly. Interrupt and focus the Mage downwardly start, disrupt Knife Trip the light fantastic one time it starts channeling and utilize a personal cooldown to survive the Soldier fixates, especially if it lines up with Mana Sting, since kiting could make you get hitting;
As the hardest stage in this challenge, your full Healing, DPS, and utility toolkit will be thoroughly tested throughout the waves, specially in the final ii. Keep an centre out on who the Mages target while casting ![]() Arcane Blitz , equally y'all volition need to throw quick powerful unmarried-target heals to prevent deaths, specially if
Arcane Blitz , equally y'all volition need to throw quick powerful unmarried-target heals to prevent deaths, specially if ![]() Knife Dance is too happening simultaneously.
Knife Dance is too happening simultaneously.
Fortunately, every class has at least 1 way to interrupt both the Mages and Soldiers at the aforementioned time, which yous can use to cancel the get-go dance channels. Go on in mind that disrupting the bandage itself but makes the Soldiers immediately utilize information technology once more, and so try to interrupt it every bit soon as it goes off, instead. If y'all do it perfectly, you will gain more than than enough time to finish the Mage off before more ![]() Knife Dancesouthward happen in every wave where this is a source of deaths.
Knife Dancesouthward happen in every wave where this is a source of deaths.
Use ![]() Leg Sweep,
Leg Sweep, ![]() Band of Peace,
Band of Peace, ![]() Psychic Scream,
Psychic Scream, ![]() Capacitor Totem,
Capacitor Totem, ![]() Typhoon, or
Typhoon, or ![]() Blinding Light for this purpose, as well as any single-target crowd control you have, such as
Blinding Light for this purpose, as well as any single-target crowd control you have, such as ![]() Hammer of Justice or
Hammer of Justice or ![]() Plough Evil.
Plough Evil.
four.ii.
2nd Stage: Searching for the Rook
Simply move ahead with your allies once you are prepare and you lot will progress into the adjacent stage one time y'all attain the locked gate.
You lot can utilize this time to fully recover from the previous battles, await for cooldowns, modify your gear, or modify your talents with a tome, if needed. Commonly yous will have the relevant cooldowns gear up when you need them later if you go immediately, regardless, as there are a few fourth dimension-consuming obstacles in the manner.
4.3.
Tertiary Stage: Desperate Times
This stage has a 5-minute timer, just you will accept more than than enough time to complete it before the timer is upwards every bit long as you keep pulling consistently. The virtually important matter is to not die or panic, so brand sure to keep a ho-hum and steady pace!
Once yous tin move again, you will be surrounded by Flickering Eye enemies which slowly move toward you. These are not hard to kill, but deal a lot of damage if you lot are near them and also explode when killed. The ideal strategy is to focus the one in front of y'all down quickly, heal yourself, and then proceed to move into the space it occupied and that should beget you more than enough time to kill some more, which opens up even more space to kite, and so on.
The next room has a Felspite Dominator and three Fel Bat Pups which enrage afterwards a short period. Simply kill off the Bats quickly and end off the Dominator afterwards. Proceed to the adjacent gate while using any impairment abilities to temporarily deactivate the Unstable Fel Orbs before moving over them.
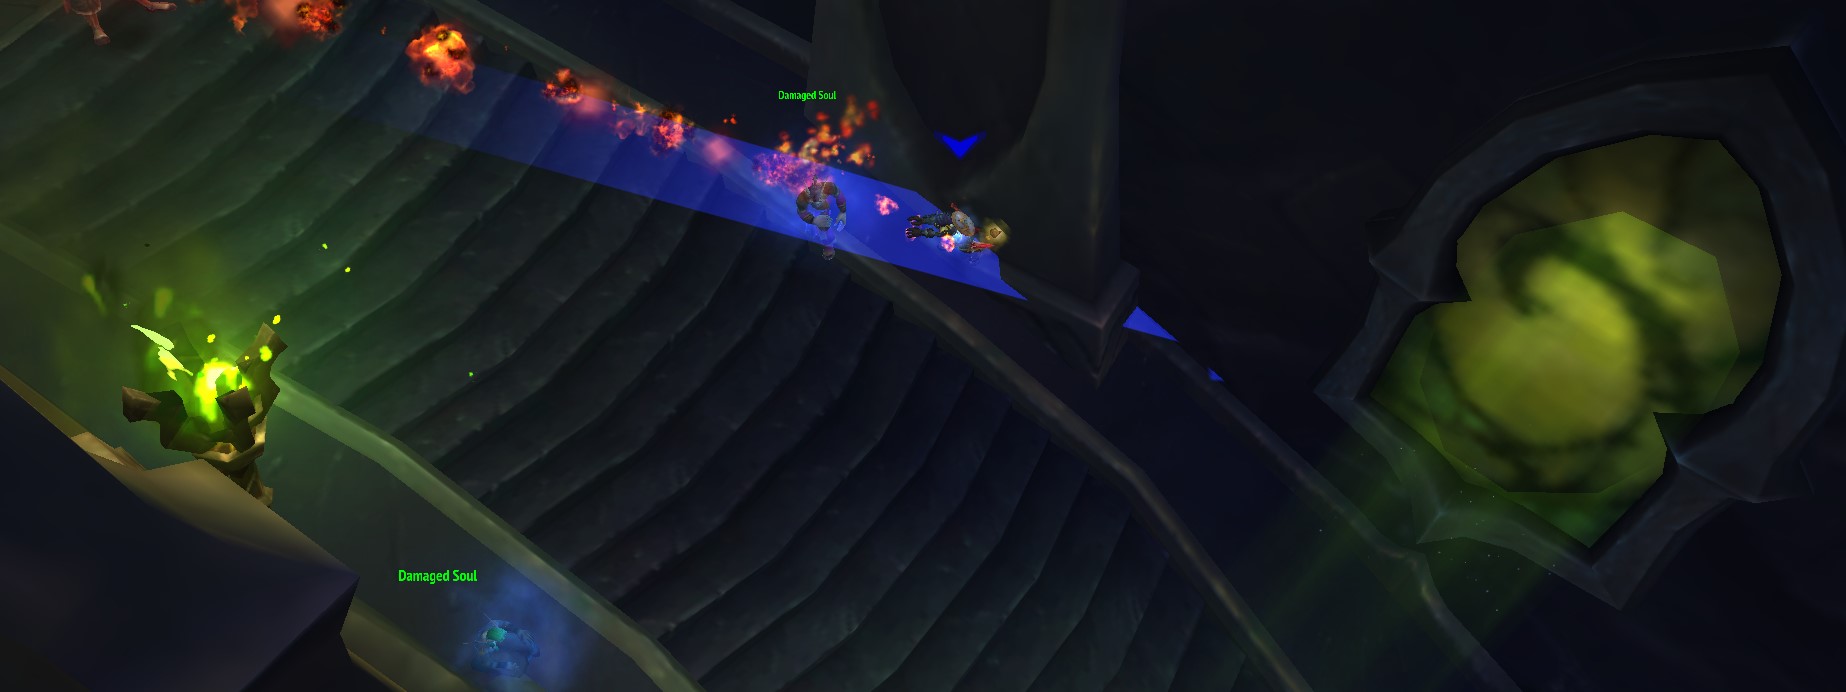
By the gate, you will observe a Panicked Soul and three Damaged Souls. Dispel the Panicked Soul to avoid being feared from its ![]() Incite Panic if it wanders well-nigh you while moving into range of the other souls — be conscientious non to aggro the hostile Corrupted Risen Arbalest at the top of the stairs, though — and heal them evenly, as they are taking damage over time and volition turn into powerful enemies if you allow them dice.
Incite Panic if it wanders well-nigh you while moving into range of the other souls — be conscientious non to aggro the hostile Corrupted Risen Arbalest at the top of the stairs, though — and heal them evenly, as they are taking damage over time and volition turn into powerful enemies if you allow them dice.
Once they are healed, kill the Arbalest standing between you and the gate, making certain to crowd control it when it uses ![]() Mana Sting, or just stand behind one of the three healed adds, who will soak it for yous, buying yous more than enough time to finish the Arbalest earlier you run out of adds to hibernate behind. These adds do not need to exist dispelled from the sting effect, as they merely run out when hit.
Mana Sting, or just stand behind one of the three healed adds, who will soak it for yous, buying yous more than enough time to finish the Arbalest earlier you run out of adds to hibernate behind. These adds do not need to exist dispelled from the sting effect, as they merely run out when hit.
The next room is full of Unstable Fel Orbs. Deactivate any orbs in your manner with your damage spells while running to the gate on the pinnacle. Exist especially careful with any orbs standing adjacent to the gate at the top of the stairs, as information technology is possible that this orb will reactivate on top of you while y'all are still opening the gate, and then move inside immediately once it opens to avoid being hit from backside.
The final room of this phase has the Dread Corruptor responsible for the capture of the remainder of your group and three Flickering Eyes. The Corruptor deals very depression damage but has high health and creates rotating laser eyes on the floor which should be avoided equally they increase your damage taken from all sources while you are touching them.
This is especially dangerous alongside the proximity attack and decease explosion of a Flickering Middle, so we recommend killing the Eyes first to free up space inside the room, as the main reason you volition dice in this room is considering of existence caught by i of the Eyes while moving away from rotating lasers. As always, brand sure to heal yourself to total after each Eye impale and reposition equally needed. Once all eyes are dead, it is a simple affair to kill the Inquisitor while moving away from the lasers whenever he throws them on the floor.
4.iv.
Fourth Stage: What Lies Ahead
This is a preparation stage, like to the 2d, where you can wait for healing cooldowns, get full health and Mana, and suit whatsoever gear or talents needed for the terminal stretch. You can become before the sated debuff from ![]() Bloodlust or drums expires, equally y'all should save it for the last phase anyway.
Bloodlust or drums expires, equally y'all should save it for the last phase anyway.
One time you are prepared, open up the last gate and go upward the stairs to meet Lord Erdris Thorn, the final boss of this challenge. You will non face him just withal, all the same...
four.5.
Fifth Stage: Erdris and the Risen
This stage serves to challenge your healing capabilities: you lot volition have to keep your allies healthy every bit they fight each other, while simultaneously healing waves of 3 spread autonomously souls before they reach the dominate and are converted into enemies.
Healing 8 souls volition finish this office of the encounter instantly, which means that you should apply healing cooldowns and consumables on the first and second waves in guild to maximize your odds of healing 6 souls, at which point you can simply use your baseline single-target heals to heal 2 souls in the concluding wave, with the third being automatically healed by the phase transition.
Under current tuning, the souls you have to heal have very little health, making them easily healed with just a few spells, or a unmarried healing cooldown.
Regardless, always prioritize healing souls to full if you cannot heal them all in time, as any souls that reach the boss will convert into enemies in Phase vi, even if they had 99% health. Y'all tin also consider letting i soul go through on purpose on the first or second waves in order to get as much fourth dimension equally possible to regenerate Mana before the final stage.
4.vi.
6th Stage: Rise, Soldiers!
Immediately beverage once this stage begins if non at full Mana.
In this phase you lot will fight all the souls you lot failed to heal in fourth dimension in the previous stage simultaneously. They catechumen into the same enemies yous fought in Phase 1 then the same strategies to bargain with them apply. I or two enemies are no trouble, three is difficult as it was earlier and four or above is almost surely a wipe. If y'all did not let any souls get through, the terminal stage volition begin nearly immediately.
4.vii.
Last Stage: A Thorn in the Side
You volition finally face Lord Erdris Thorn himself. Be gear up to start DPSing him as soon equally he becomes active! The soft enrage timer under electric current tuning is extremely tight, and you will have to DPS a lot to make it in fourth dimension, at least if you lot are not using any special gear or consumables.
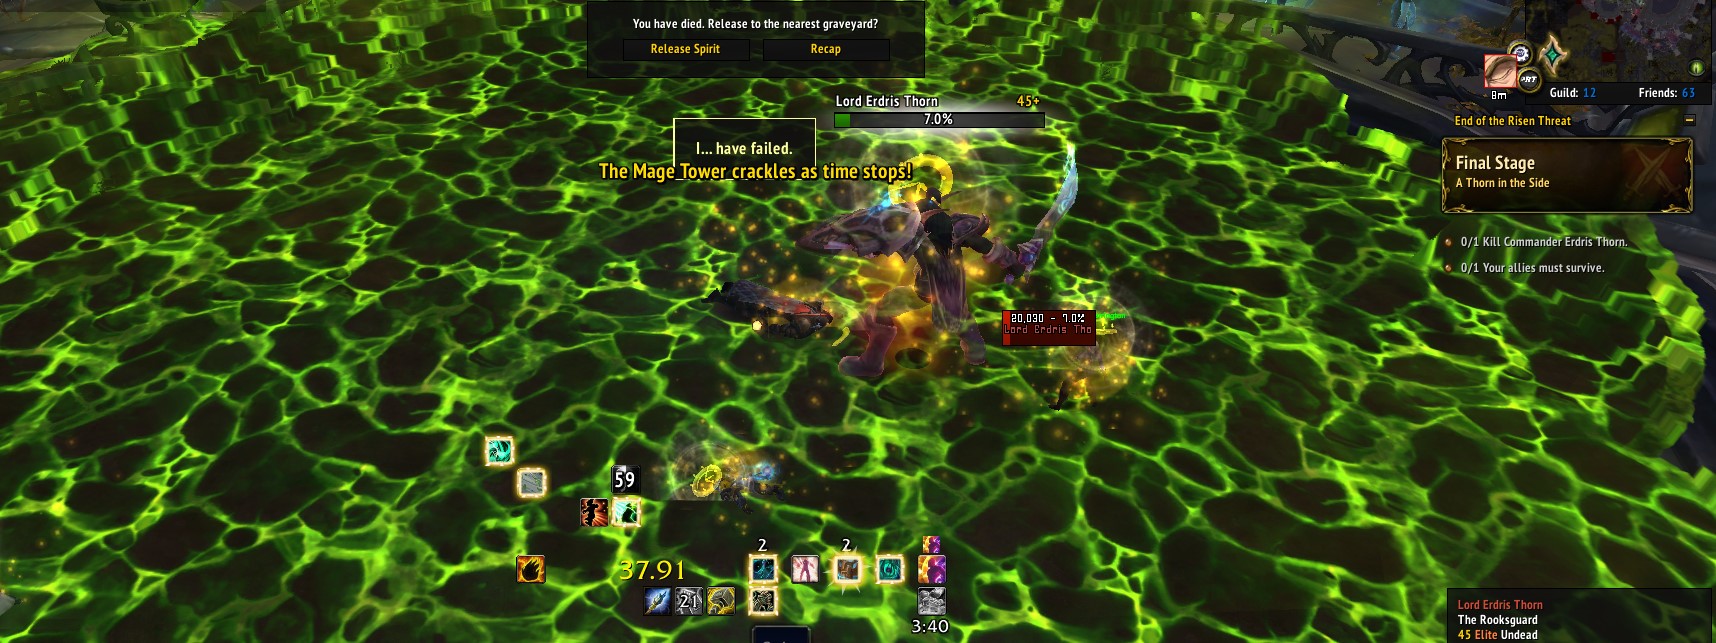
Losing at this stage with only a few pct left on Erdris is quite painful, so brand sure to use a DPS potion at the get-go of the phase and popular ![]() Bloodlust or
Bloodlust or ![]() Drums of Deathly Ferocity to make the most out of the initial part earlier the dominate starts using his mechanics.
Drums of Deathly Ferocity to make the most out of the initial part earlier the dominate starts using his mechanics.
He will periodically jump on top of you, dealing damage and leaving a fel damage zone on the ground. Make sure to position these in the edges of the room and most previous zones, and slowly circle around the room in order to maximize the space y'all have available until the whole room is covered in fel, which is the soft enrage yous have to beat.
The spring and fel zones would be easy to bargain with were it not for ![]() Ignite Soul, which is too periodically cast on you and both abilities are constantly overlapping.
Ignite Soul, which is too periodically cast on you and both abilities are constantly overlapping.
You lot want to accept enough health left to survive the jump harm and one tick of the fel zone, but not so much wellness that you oneshot your allies with ![]() Ignite Soul. Because this amount can vary a lot with your personal health puddle, we recommend yous to pay close attending to how much health yous lose with the first spring and fel zone ticks while moving out. That is the corporeality of wellness yous will desire to have whenever y'all are not about to explode.
Ignite Soul. Because this amount can vary a lot with your personal health puddle, we recommend yous to pay close attending to how much health yous lose with the first spring and fel zone ticks while moving out. That is the corporeality of wellness yous will desire to have whenever y'all are not about to explode.
![]() Ignite Soul lasts for 9 seconds earlier exploding for damage equal to your electric current life total to the rest of your party. You can use the fel zones to speedily lose health if needed in order to lower your health as much equally you dare before exploding. Just exist conscientious that you tin get jumped on when waiting to explode, and if you are killed it will be down to whether your party can downwardly the boss earlier any of them dies. Using a personal cooldown while waiting for the explosion to occur is a practiced way to ensure you will not exist killed by a badly-timed jump while at depression health.
Ignite Soul lasts for 9 seconds earlier exploding for damage equal to your electric current life total to the rest of your party. You can use the fel zones to speedily lose health if needed in order to lower your health as much equally you dare before exploding. Just exist conscientious that you tin get jumped on when waiting to explode, and if you are killed it will be down to whether your party can downwardly the boss earlier any of them dies. Using a personal cooldown while waiting for the explosion to occur is a practiced way to ensure you will not exist killed by a badly-timed jump while at depression health.
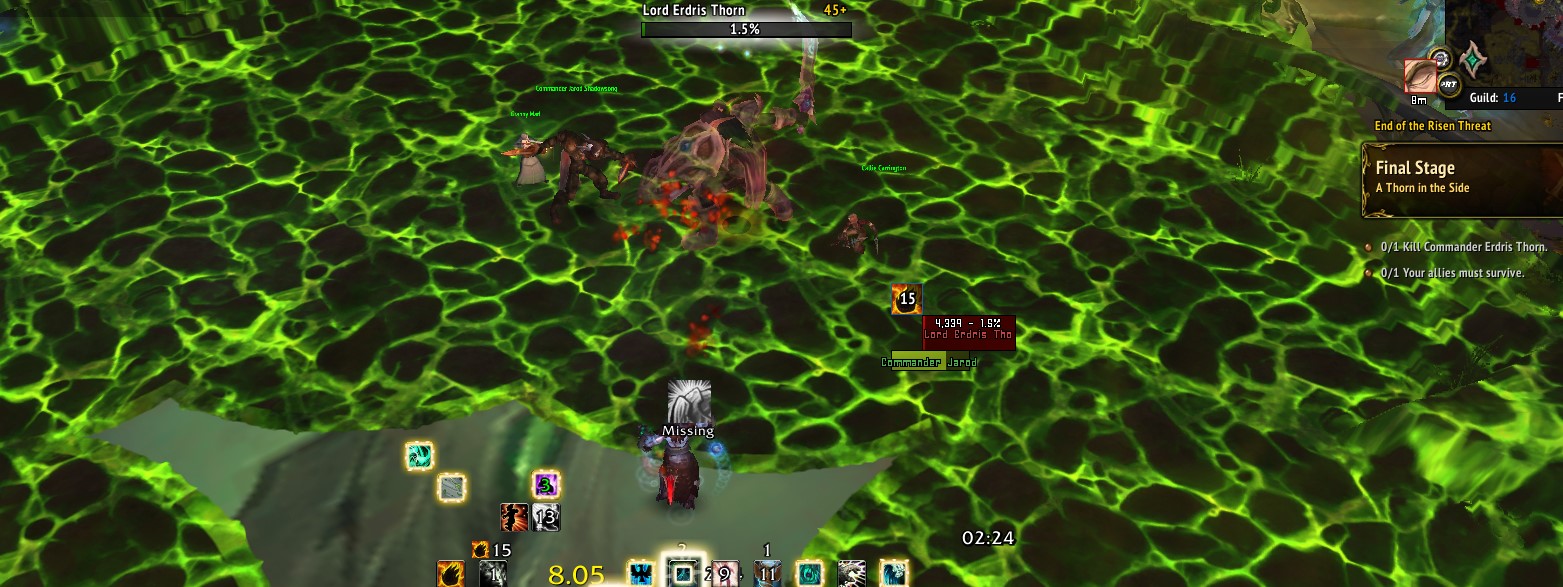
Ultimately, this is a DPS race where you lot besides need to heal your party and advisedly command your health. The most important things are positioning the fel zones around the edges of the room to delay the enrage equally much equally possible and keeping everyone healthy, except yourself when about to explode with ![]() Ignite Soul.
Ignite Soul.
In one case the boss dies, even if yous are too dead, you win the challenge and receive your rewards!
5.
Rewards for the Healer Mage Tower Claiming
Your reward for completing the challenge is a transmog set of armor that is a recolored version of the Tomb of Sargeras set for your class, which was in plough inspired by TBC'southward Tier 6, which dropped in the Black Temple.
If you can manage to do all 7 challenges at to the lowest degree one time, you will also obtain the ![]() Mage-Bound Spelltome mount and the
Mage-Bound Spelltome mount and the ![]() A Tour of Towers achievement. Completing every challenge beyond all classes and specializations also awards the
A Tour of Towers achievement. Completing every challenge beyond all classes and specializations also awards the ![]() Belfry Overwhelming Feat of Forcefulness.
Belfry Overwhelming Feat of Forcefulness.
You can learn more about this mount and all the others added in Patch 9.1/9.ane.five below.
- 08 December. 2021: Replaced images with more recent versions taken from the live claiming and adapted many of the tips to the current tuning of the challenge.
- 01 Dec. 2021: Guide added.
Show more
Prove less

End Of The Risen Threat,
Source: https://www.icy-veins.com/wow/end-of-the-risen-threat-a-legion-timewalking-mage-tower-guide
Posted by: stewartthimplutwere.blogspot.com
0 Response to "End Of The Risen Threat"
Post a Comment